Understanding the API Gateway Design Pattern
In the world of microservices, the API Gateway design pattern plays a crucial role in managing how clients communicate with your backend services. This article will break down what an API Gateway is, why you need one, and provide real-time examples that are easy to understand.

What is an API Gateway?
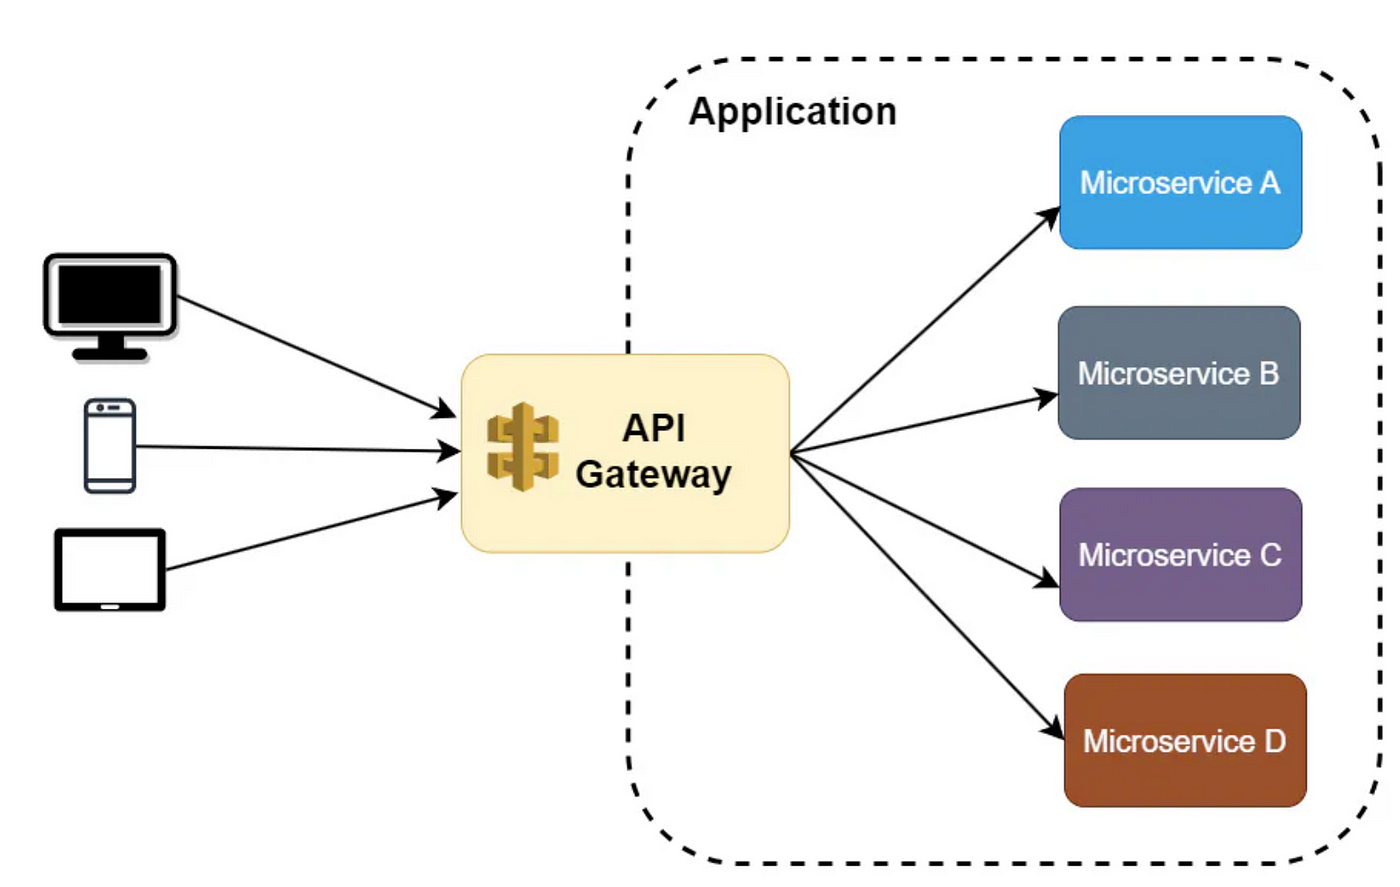
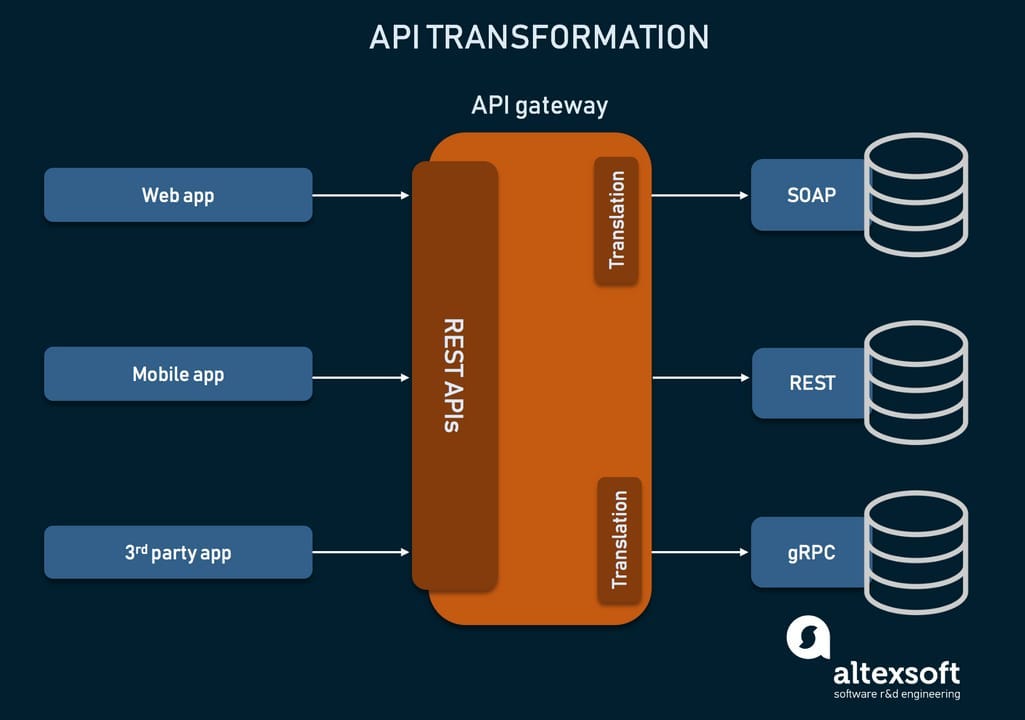
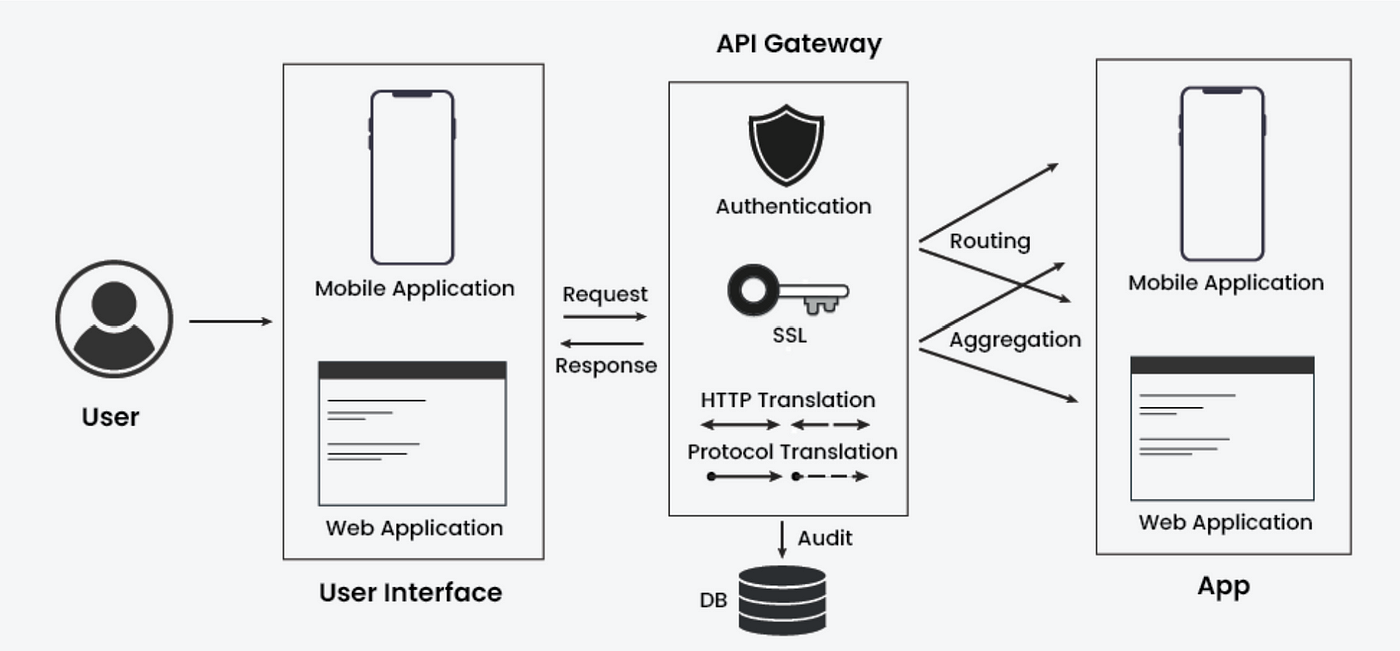
An API Gateway is a server that acts as a single entry point for all clients (like web and mobile apps) to access multiple microservices. Instead of communicating directly with each microservice, clients interact with the API Gateway. This gateway then routes the requests to the appropriate microservice, gathers the responses, and sends them back to the clients.

Why Use an API Gateway?
- Single Entry Point: Clients only need to know one URL to access all services.
- Load Balancing: Distributes incoming requests among multiple service instances, improving reliability and performance.
- Security: Centralizes authentication and authorization, reducing the need for each microservice to handle these concerns individually.
- Monitoring and Logging: Captures logs and metrics for all requests in one place, making it easier to track performance and issues.
- Rate Limiting: Prevents abuse by controlling how many requests a client can make in a given timeframe.

How Does an API Gateway Work?
When a client sends a request, it goes to the API Gateway. Here’s a simplified flow of how it works:
- Client Request: The client sends a request to the API Gateway.
- Request Routing: The API Gateway examines the request and determines which microservice to call.
- Service Call: The Gateway forwards the request to the appropriate microservice.
- Response Handling: Once the microservice processes the request, it sends a response back to the API Gateway.
- Client Response: The API Gateway then sends the final response back to the client.
Basic Example
Imagine you have an online store with three microservices:
- Product Service: Handles product listings.
- Order Service: Manages orders and transactions.
- User Service: Manages user accounts.
Without an API Gateway, a client (like a mobile app) would have to call each microservice separately, which can be cumbersome and lead to performance issues.
With API Gateway:
- The client sends a single request to the API Gateway to fetch a product, place an order, or manage user accounts.
- The Gateway routes the requests to the respective services and sends back the aggregated response.
Project Setup
We’ll start by creating an API Gateway service and three microservices (Product, Order, and User services). Below is the detailed implementation of each step.
Step 1: Creating the API Gateway
Dependencies in pom.xml for API Gateway : We first need to set up a new Spring Boot project for the API Gateway. Here are the required dependencies for Spring Cloud Gateway:
<dependencies>
    <!-- Spring Boot Web Dependency -->
    <dependency>
        <groupId>org.springframework.boot</groupId>
        <artifactId>spring-boot-starter-web</artifactId>
    </dependency>

    <!-- Spring Cloud Gateway -->
    <dependency>
        <groupId>org.springframework.cloud</groupId>
        <artifactId>spring-cloud-starter-gateway</artifactId>
    </dependency>

    <!-- Spring Boot Actuator for Health Checks -->
    <dependency>
        <groupId>org.springframework.boot</groupId>
        <artifactId>spring-boot-starter-actuator</artifactId>
    </dependency>

    <!-- Eureka Client (Optional for Service Discovery) -->
    <dependency>
        <groupId>org.springframework.cloud</groupId>
        <artifactId>spring-cloud-starter-netflix-eureka-client</artifactId>
    </dependency>
</dependencies>

<dependencyManagement>
    <dependencies>
        <dependency>
            <groupId>org.springframework.cloud</groupId>
            <artifactId>spring-cloud-dependencies</artifactId>
            <version>Hoxton.SR12</version> <!-- Version of Spring Cloud -->
            <type>pom</type>
            <scope>import</scope>
        </dependency>
    </dependencies>
</dependencyManagement>- Spring Cloud Gateway is responsible for routing and forwarding requests to different services.
- Actuator enables health checks, which are useful for monitoring microservices.
- Eureka Client helps in service discovery, allowing services to register themselves and the gateway to dynamically discover them.
Step 2: API Gateway Routing Configuration
Now, configure routes in the API Gateway to route requests to the respective microservices. We can configure these routes in the application.yml file.
Example application.yml:
server:
  port: 8080  # API Gateway runs on port 8080

spring:
  cloud:
    gateway:
      routes:
        - id: user-service
          uri: http://localhost:8081   # User service URL
          predicates:
            - Path=/user/**

        - id: order-service
          uri: http://localhost:8082   # Order service URL
          predicates:
            - Path=/order/**

        - id: product-service
          uri: http://localhost:8083   # Product service URL
          predicates:
            - Path=/product/**
Explanation:
- Routes define which incoming requests should be routed to which services.
- Predicates are conditions that trigger the route. Here, any path that starts with /user/** will be routed to the User Service.
Step 3: Setting up Microservices (Product, Order, User)
For each microservice (Product, Order, and User), create separate Spring Boot applications. Each service will run on a different port.
Dependencies for a Microservice (e.g., User Service pom.xml):
<dependencies>
    <dependency>
        <groupId>org.springframework.boot</groupId>
        <artifactId>spring-boot-starter-web</artifactId>
    </dependency>

    <!-- Eureka Client (optional if using service discovery) -->
    <dependency>
        <groupId>org.springframework.cloud</groupId>
        <artifactId>spring-cloud-starter-netflix-eureka-client</artifactId>
    </dependency>
</dependencies>
Controller for the User Service (UserController.java):
@RestController
@RequestMapping("/user")
public class UserController {

    @GetMapping("/info")
    public String getUserInfo() {
        return "User Info: John Doe";
    }
}
Similarly, you can create controllers for Order Service and Product Service to handle respective functionalities.
Step 4: Running the Microservices
- Start the User Service on port 8081.
- Start the Order Service on port 8082.
- Start the Product Service on port 8083.
- Start the API Gateway on port 8080.
When you access http://localhost:8080/user/info, the request will be forwarded by the API Gateway to the User Service running on port 8081.
Step 5: Adding Extra Features to the API Gateway
1. Load Balancing
If you have multiple instances of a microservice, you can enable load balancing with Eureka by simply specifying the service name instead of a static URI in application.yml.
spring:
  cloud:
    gateway:
      routes:
        - id: user-service
          uri: lb://USER-SERVICE
          predicates:
            - Path=/user/**
Here, lb://USER-SERVICE refers to a service registered with Eureka under the name USER-SERVICE.
2. Global Filters for Security and Logging
Filters can be applied globally to modify requests and responses.
@Bean
public GlobalFilter customGlobalFilter() {

    return (exchange, chain) -> {
        System.out.println("Global Pre Filter executed");

        return chain.filter(exchange).then(Mono.fromRunnable(() -> {
            System.out.println("Global Post Filter executed");
        }));
    };
}- Pre-filters can inspect or modify incoming requests.
- Post-filters can modify responses or perform actions after a response is sent.
3. Rate Limiting
You can apply rate limiting to prevent abuse.
spring:
  cloud:
    gateway:
      routes:
        - id: user-service
          uri: http://localhost:8081
          predicates:
            - Path=/user/**
          filters:
            - name: RequestRateLimiter
              args:
                redis-rate-limiter.replenishRate: 10
                redis-rate-limiter.burstCapacity: 20
This configuration limits the number of requests to 10 per second for the USER-SERVICE and allows bursts of up to 20 requests.
Real-Time Scenario
Let’s consider a real-time example of a travel booking application. In this application, there are several microservices:
- Flight Service: Searches and books flights.
- Hotel Service: Searches and books hotels.
- Car Rental Service: Searches and books rental cars.
Without an API Gateway:
- A user wants to book a complete travel package: flights, hotel, and car rental.
- The client app must call the Flight Service, then the Hotel Service, and finally the Car Rental Service separately.
- This results in multiple requests and longer wait times for the user.
With an API Gateway:
- The user sends one request to the API Gateway to book the entire package.
- The API Gateway makes calls to the Flight Service, Hotel Service, and Car Rental Service in the background.
- Once all services respond, the Gateway compiles the data and sends a single response back to the user.
Handling Different Scenarios with API Gateway
- Authentication: When a client requests to book a flight, the API Gateway checks if the user is authenticated. If not, it redirects them to the login service.
- Error Handling: If the Flight Service is down, the API Gateway can return a user-friendly error message instead of exposing internal service errors.
- Caching: If multiple clients frequently request the same flight details, the API Gateway can cache the response, reducing load on the Flight Service.
- Versioning: If a new version of the Flight Service is deployed, the API Gateway can route traffic to the old or new version as needed, allowing for smooth transitions.
Conclusion
The API Gateway design pattern simplifies how clients interact with microservices. By centralizing requests, managing load balancing, securing communication, and providing monitoring, it enhances both performance and user experience.
Implementing an API Gateway is a crucial step in building robust and scalable microservices architecture.
Feel free to follow me for more such articles!
Very Informative!
ReplyDelete